
Hello, Sara here. Today I’ve prepared a very special episode. Since Thanksgiving is coming soon, I felt like making something special. The Hanbok is native to Korea and has been worn for centuries with styles ranging to suit everyday wear to formal, ceremonial wear.
This pattern by Dailylike is a modernized wrap-dress version of the Hanbok that still retains some of the traditional features that make this style so unique.
This tutorial will cover both the adult ‘s and girl’s versions of the dresses, but because there are quite a few steps, and some quite complicated, I will break this tutorial into two parts.
The Hanbok dress is a beautiful and unique dress but I hesitated to make a tutorial as the pattern is not universally body-friendly as it only comes in four sizes with a fit meant for Asian bodies. additionally, the pattern is Korean, which means there are some differences in sewing methods but don’t worry, I’ll cover them in the tutorial.
even so, I’ve had several requests for this video tutorial and I’m hoping that you will be able to make your own to your own specifications!
This is Part 1 for the video instruction of Hanbok. Part 2 is coming.
Although I always try my best to give you a clear and easy to understand instruction, I strongly recommend you watch the video at least once to get the right idea. You can always come back and read the part that you forgot or wasn’t sure of.
Material
Hanbok Pattern (Korean) from Daillylike (No PDF pattern)
North America
https://bit.ly/30VsuBx (For Adults)
https://bit.ly/2SvQuGL (For Kids)
LDH Shears
https://etsy.me/3d3VawQ
WashAway Wonder Tape
Canada https://amzn.to/3mnHt03
USA https://amzn.to/33zpLxM
Craft Clips
Canada https://amzn.to/32vmK2u
USA https://amzn.to/32w91s4
All the fabrics I used are from my fabric studio
https://www.etsy.com/ca/shop/TwoONineFabricStudio
LDH Scissors and thread snip
https://www.etsy.com/ca/shop/TwoONineFabricStudio
These are my online fabric shops.
All the fabrics I use are from either Dailylike Canada or Two O Nine Fabric Studio.
Dailylike Canada http://www.dailylike.ca
Two O Nine Fabric Studio https://www.etsy.com/shop/twooninefabricstudio
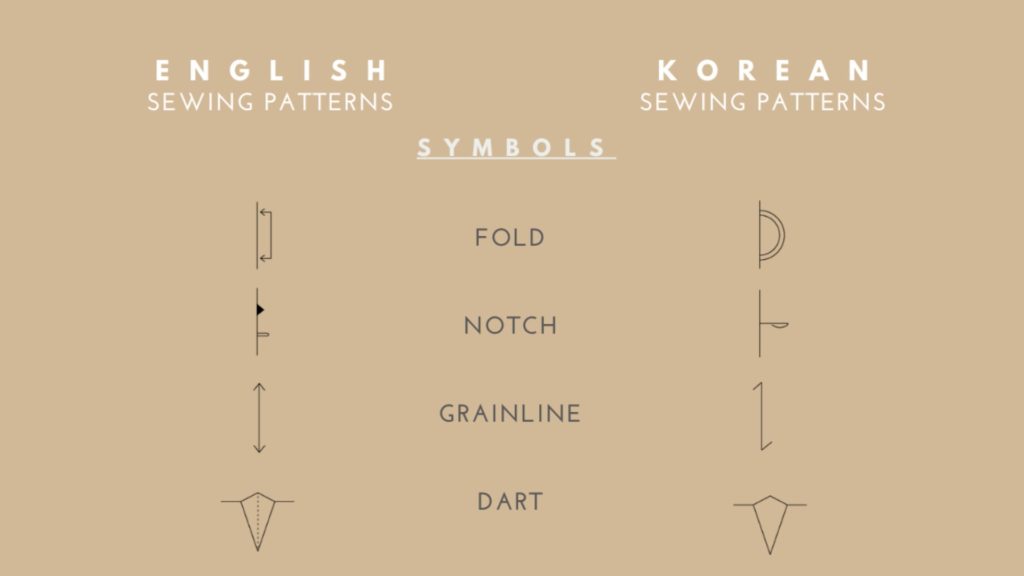
Make sure to know the difference when you read the pattern.


You can use your own Seam Allowance.
Cut
2 Front Bodice (Mirrored), 2 Back Bodice (Mirrored)
*Add seam allowance all around the edges
2 Collar, 2 Front Lining (Mirrored)
*Add seam allowance all around the edges
2 Sleeve (Mirrored), 2 Skrt Panel (*3 Skirt Panels for Sizes L/XL)
*Add seam allowance all around the edges, 2″ SA for hems
2 Main Tie, 2 Upper Tie (for Adult), 1 Waistband (for Adult)
*Add seam allowance all around the edges
2 Inner Tie
*You can replace them with cotton ribbons
0. Preparation (Fuse Interfacing)
Fuse light-featherweight interfacing to 1 Collar and 2 Front Lining

0. Preparation (Make Ties)
Fold one short edge WST (Wrong Side Together) and press
Fold in half and press
Edgestitch
We need total 6 ties (2 Inner Ties, 2 Upper Ties and 2 Main Ties)
*I recommend having 6 ties for girls’ too!

1. Darts (For Adult Version)
Fold by matching the marks and pin RST (Right Side Together)
Sew from the edge to the center
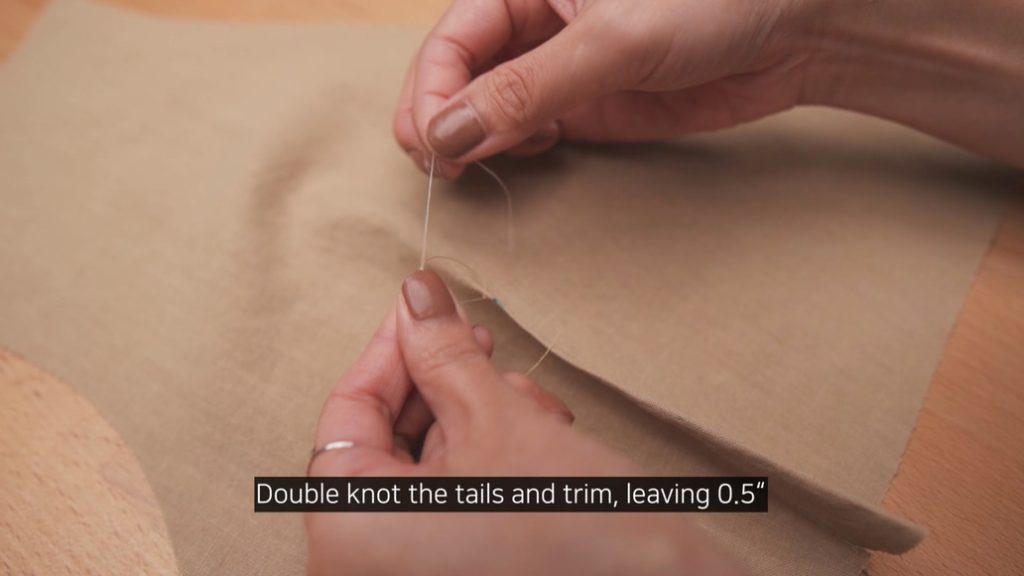
No back stitches! Leave the tails of the thread
Double knot the tails and trim, leaving 0.5″
Repeat for all other darts
Press the darts towards the side and bottom
2. Back Bodice
Sew Back Bodice RST at the back seam RST
And serge
Press the seam towards either side

3. Assemble Bodice & Ties
Sew the Back Bodice and Front Bodice RST at the Shoulders
And serger
Press the seams towards the back
Baste on Upper Tie on the side RST

Baste one Inner Tie on the wrong side
And sew the sides of Back Bodice and Front Bodice
And serge
4. Waistband (For The Adult Version)
Sew one long edge of Waistband to the Bodice RST
And serge
Press the seam towards the side the seam naturally lays

Understitch or Topstitch
5. Sleeve
Fold the sleeve and pin underarm seams RST
Sew and serge

Sew two parallel lines (Stitch length 4-5) at the sleeve cap (between the notches)
Leave the thread tails without back stitches to use them for gathering
Make some gathers

Slip the sleeve into the armhole and match the notches RST
Match the shoulder seams

Distribute the gathers evenly and sew
And serge
Feel free to modify the length of the sleeves (I cut by 3″)
Double-fold the sleeve hem and press WST
Edgestitch or Topstitch
Repeat for the other sleeve

6. Front Lining & Ties
Pin and baste the Inner Tie
Pin and baste on Upper Tie and one Main Tie on the proper locations

Pin and sew the Lining to the Front Bodice
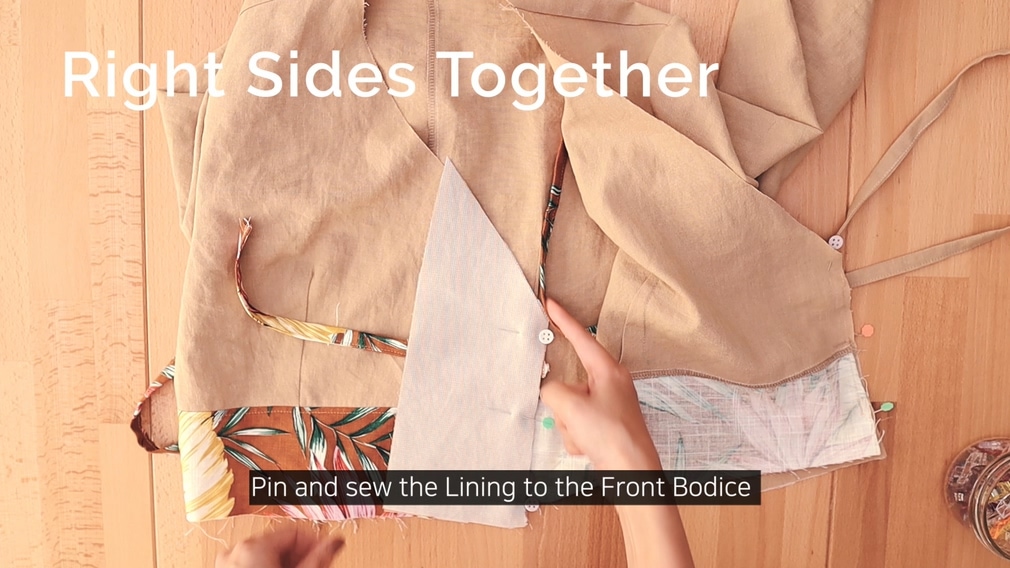
Press the Lining towards the seam and understitch
Fold along the main stitch and press

All right. That’s it for the part 1.
Part 2 will be updated in a few days. I will leave a link below once it’s up.
I’ll see you very soon with the next post!
Part 2 of Hanbok Tutorial. Thanks for your patience!
Just remind you again, I strongly recommend you to watch the video if you are stuck!
7. Skirt
Pin and sew the sides of Skirt panels RST (Right Side Together)
And serge
Doublefold the side edge of the Skirt panel WST (Wrong Side Together)

And edgestitch the folded edge
Repeat for the other side edge
Fold the Skirt in half and clip or mark according to the markings on the pattern
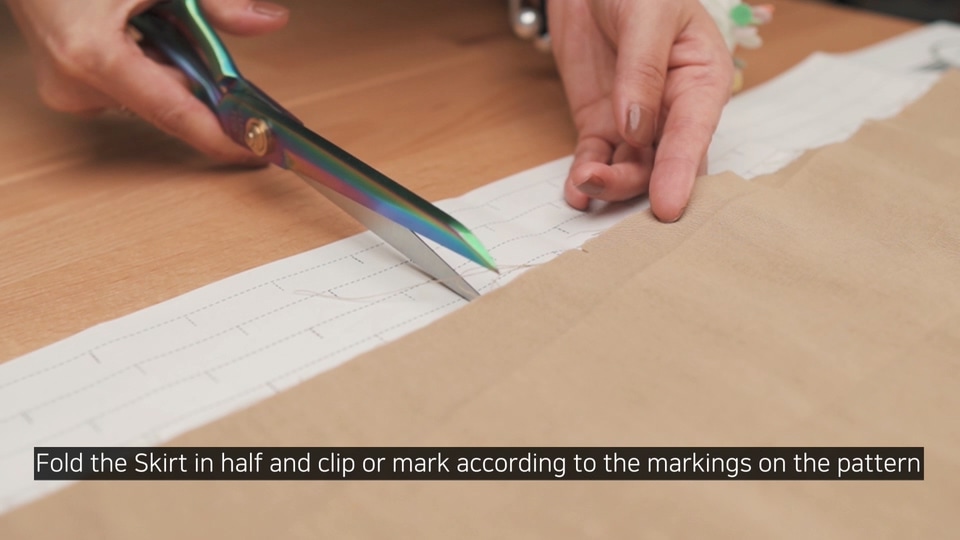
Make pleats by folding and matching the marks
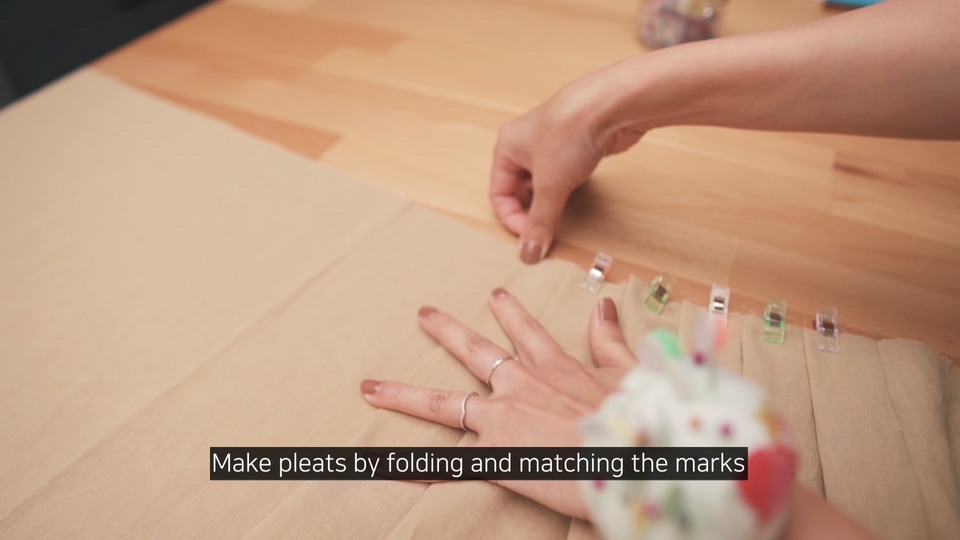
Or you can use your preferred method to gather the pleats
Make sure the finished length matches the length of the bottom of the waist piece
Baste the pleats
8. Assemble Bodice And Skirt
Pin and sew the Waistband and Skirt RST
If the layers are not perfectly matched, try your best to match the length
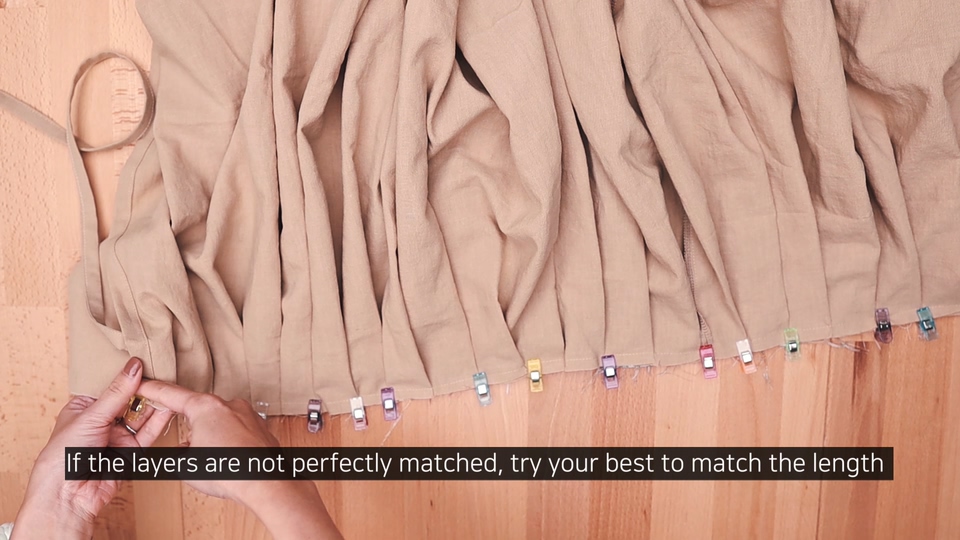
And serge beginning at the Front Lining
Press the seam towards the Waistband
And fold and press the edge of the Front Lining towards the Bodice
Fold the Front Lining towards the Bodice and pin

Understitch/topstitch from the right side
Pin and edgestitch the folded edge of Front Lining to the Bodice
Optional) I stopped sewing at the Waistband as I didn’t like the look from the right side

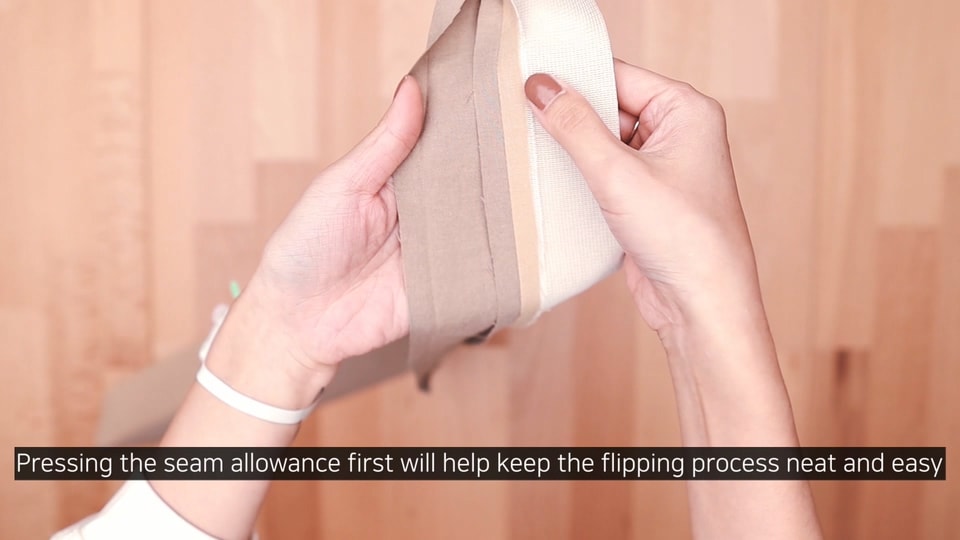
9. Collar
Fold and press the seam of the bottom (curvy) edge of one of the Collars WST
Pin and sew the top and side edges of the Collars RST
Flip the Collar and press
Pressing the seam allowance first will help keep the flipping process neat and easy
Pin the neckline of Bodice and the Collar RST
Instead of matching the corners, match the soon-to-be stitched line

Make sure not to sew the folded layer
Overlap the folded edge of the Collar on the stitch line slightly

Pin or use Wonder Tape to keep it in place
Topstitch/edgestitch from the right side
10. Main Tie
Sew the Main Tie onto the Waistband

And you are all done!! Again, I’m sure you would come across some tricky parts that need extra attention. However, the harder the challenge, the more satisfied once you complete it right?
I’m quite active on Instagram! Post yours and tag me! I can’t wait to see your masterpiece. Thank you all. See you on the next post!
*****Disclosure******
Some of the links above are affiliate links. .Clicking and purchasing through affiliate links gives me a small commission. BUT MORE IMPORTANTLY, I wanted to help you find the materials easier. So you can focus more on your project. Thank you.
**********************
Here’s my Patreon page link. Your support is greatly appreciated! https://www.patreon.com/user?u=32815284
Let’s get connected!
Sewing Therapy
Instagram – https://www.instagram.com/yoursara_k/
Blog – https://sewingtherapy.net/
Twitter – https://twitter.com/SewingTherapy
Dailylike Canada
Instagram – https://www.instagram.com/dailylikecanada
Facebook – http://www.facebook.com/dailylikecanada
Pinterest – https://www.pinterest.ca/dailylikecanada
Two O Nine Fabric Studio
Instagram –https://www.instagram.com/twooninefabric