
Hello, Sara from Vancouver here, with a tutorial for another great pattern: The Pietra Pants by Closet Core Patterns! These pants straddle that narrow line where style and comfort meet, thanks to a flat front, high-waisted silhouette, and an elastic waist in the back. The style of these pants remind me of the Clyde Pants by Elizabeth Suzann, but the Pietra Pants are more constructed in the front. I absolutely love the slanted hip pockets and consider them the gem of this pattern! This pattern offers several leg styles: a wide leg in floor-skimming or cropped length (View A), a slim and tapered leg (View B), or gently flared shorts (View C).
I strongly recommend you to watch the video, especially with some of details that you might not understand with simple writing instructions.
These are my online fabric shops.
Dailylike Canada http://www.dailylike.ca
Two O Nine Fabric Studio https://twooninefabric.ca
Pietra Pants and Shorts Pattern from Closet Core Patterns
https://store.closetcorepatterns.com/collections/sewing-patterns-all/products/pietra-pants-shorts-pattern
The sewing machine I have:
Bernette B37 Swiss Design Computerized Sewing Machine
https://amzn.to/3etYaFE (USA)
LDH Scissors and thread snip
http://bit.ly/3vbHj04
The items I always use for my sewing project
Tailor’s Chalk Pencil
http://bit.ly/chalkpencil
Poly Sewing Thread
https://twooninefabric.ca/collections/sewing-thread
Lightweight Fusible Interfacing
http://bit.ly/fusible_interfacing
Craft Clips
Canada https://amzn.to/32vmK2u
USA https://amzn.to/3sjKKiU
Flat Head Pins
Canada https://amzn.to/2IaKoKm
USA https://amzn.to/32slD31
Point Turner
Canada https://amzn.to/39rgfQA
USA https://amzn.to/3qjfKyA
Wash-away Wonder Tape
Canada https://amzn.to/35DUwUj
USA https://amzn.to/39ylJc2
Let’s get started
Seam Allowance
Use 5/8″ seam allowance unless otherwise stated
Material
Pietra Shorts and Pants Pattern from Closet Core Patterns
Lightweight Fusible Interfacing, Elastic

Recommended Fabric
A Variety of fabrics depending on the desired effect
Cut
* I wrote W on the wrong side of the fabric for less confusion
2 Pocket (Mirrored), 2 Side Front Short (Mirrored), 2 Center Front Short (mirrored), 2 Back Short (Mirrored), 1 Center Front Facing, 2 Side Front Facing (Mirrored), 1 Back Waistband
1. Pockets
Apply interfacing to the wrong side of the Pockets

Pin and sew the angled seam of Pocket and Side Front Short RST (Right Side Together)
Press the Pockets towards the seam and understitch
*Understitching is stitching that is sewn as close to the seam line as possible holding the seam tot he facing or lining.
Fold along the main stitch and press WST (Wrong Side Together)
Fold Pocket in half at notches and pin RST
Baste
*Basting is a temporary stitch to hold several layers in place

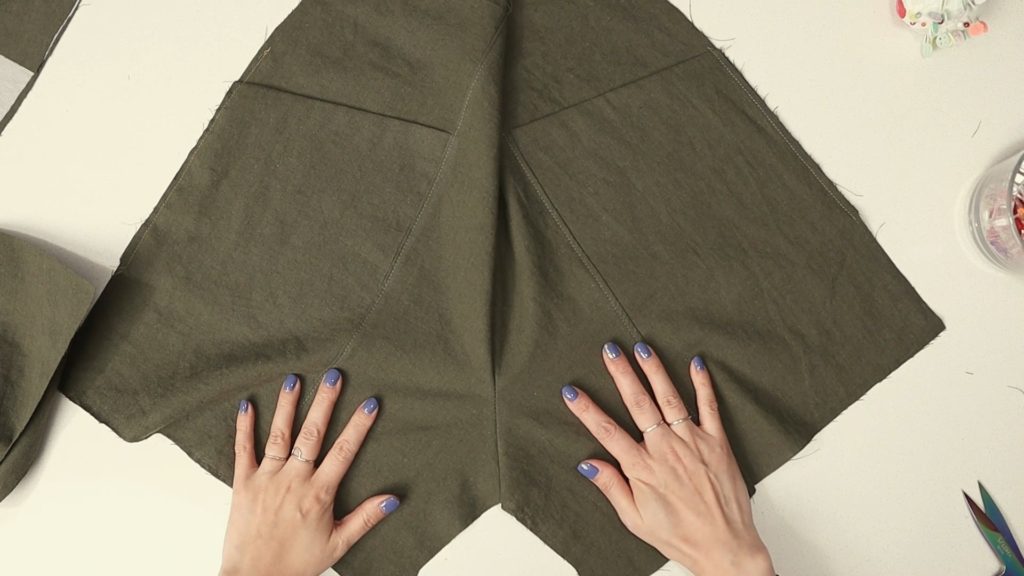
2. Front Legs
Pin and sew the Center Front Short and Pocket panel RST
Serge
Press the Center Front Short towards the seam
Optional: Topstitch

Pin and sew Right and Left Center Short together at curved crotch seam RST
Serge
3. Front Facing
Pin and sew Center Front Facing and Side Front Facing RST (Make sure they are interfaced)
Press seam open
Pin and sew Center Front Facing and other side RST
Pin and sew Front Short and Front Facing RST

Finish the bottom edge of Front Facing in your preferred method
Press Front Facing towards the seam
Understitch

Fold along the main stitch and press WST
Match up the seams of Front Short and Front Facing and pin
Stitch in the ditch to secure the Front Facing to Front Short
* Stitch in the ditch is a technique to sew down the seam line. When the thread color matches the fabric, the stitches are virtually invisible.

4. Back Legs
Pin and sew Back Shorts at center back seam RST
Serge
5. Back Waistband
Fold 1/2″ of the long edge and press WST
Fold in half along the center notches and press for a guide line
Pin and sew Back Waistband and Back Short at the waist

Press the seam up
Don’t fold the Back Waistband yet
Match the notches, pin and sew Front Short and Back Short at the side seams RST
Fold the Back Waistband down over the Front Short
Pin and sew at Side
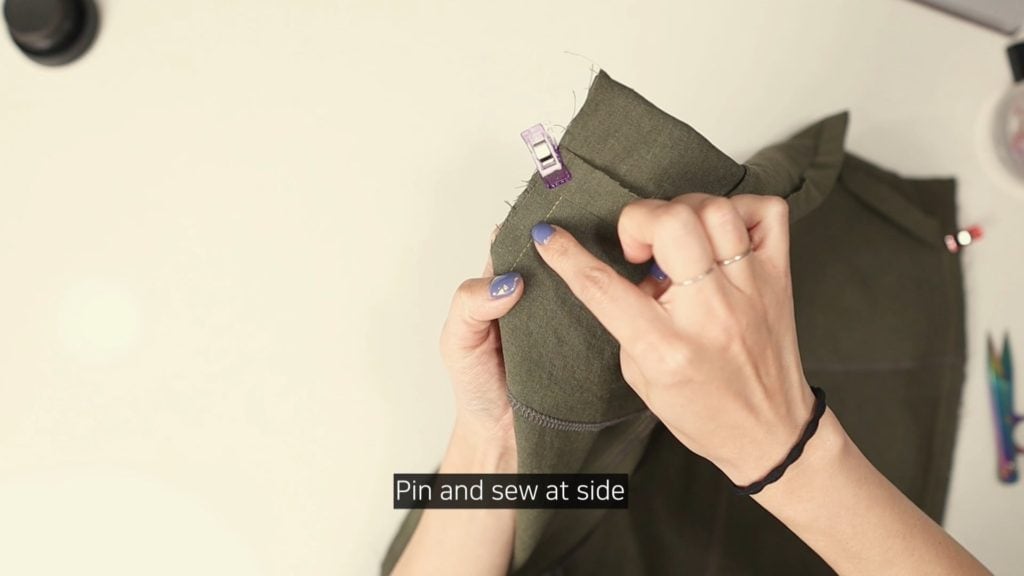
Serge the side seams
Pin and sew one end of the elastic at the side seam
Pin the other end of the elastic to the other side and try it on!

If the sizing is good, go ahead and sew the elastic
Flip the Waistband in place to cover the elastic
Slightly cover the stitch line with the Waistband and pin
*It’s not easy to do this step all at once because of the elastic, so I broke it up into two steps
Stitch in the ditch or Edgestitch from the outside
Make sure to sew through all the layers (not including the elastic)
Repeat for the other half
Distribute the gathers evenly
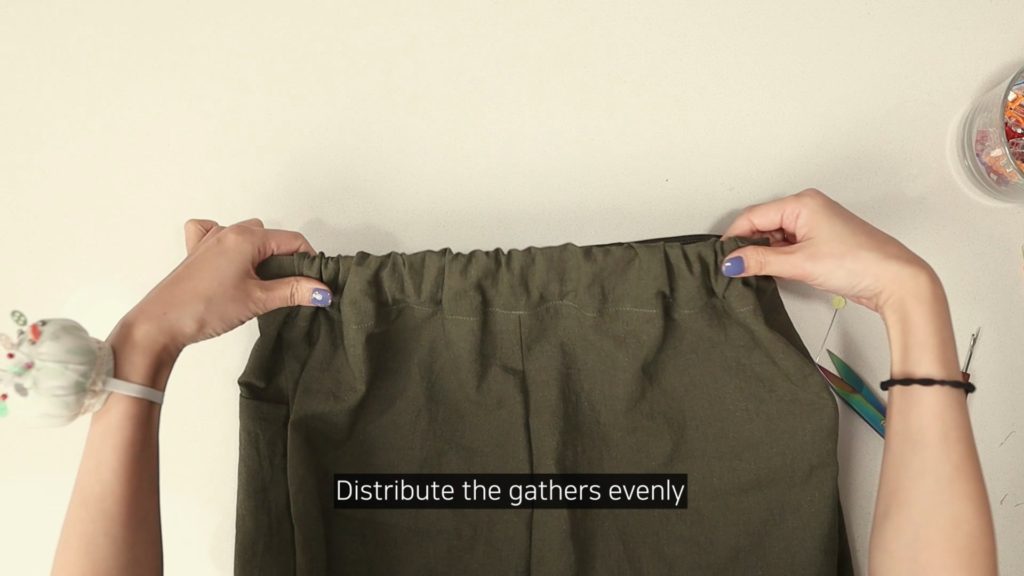
Sew two parallel lines of topstitching on the Waistband
Use a longer stitch length and stretch the elastic as you sew
Stitch Length 3.5-4
6. Inseam
Pin the Front and Back at the inseam RST
Sew and serge
Or finish the seam, fold once and topstitch/edgestitch

And that’s it for today! Thanks for reading and I will see you in the next post!
*****Disclosure******
Some of the links above are affiliate links. .Clicking and purchasing through affiliate links gives me a small commission. BUT MORE IMPORTANTLY, I wanted to help you find the materials easier. So you can focus more on your project. Thank you.
*******************
Let’s get connected!
Sewing Therapy
Instagram – https://www.instagram.com/yoursara_k/
Blog – https://sewingtherapy.net/
Twitter – https://twitter.com/SewingTherapy
Dailylike Canada
Instagram – https://www.instagram.com/dailylikecanada
Facebook – http://www.facebook.com/dailylikecanada
Pinterest – https://www.pinterest.ca/dailylikecanada
Two O Nine Fabric Studio
Instagram –https://www.instagram.com/twooninefabric